• Portfolio
  • The Ritual // BuJo
  • Workshops
  • ITP Blog
  • Idea Compost
  • Resume
  • Bio/Contact

J. August Luhrs

  • Portfolio
  • The Ritual // BuJo
  • Workshops
  • ITP Blog
  • Idea Compost
  • Resume
  • Bio/Contact

ICM Final: Tradetatos

After starting with the goal of just having some sort of shared network interaction between players on different devices, I took the ideas garnered from our in-class playtesting and decided to branch off from the original game concept and make a new game.

Tradetatos is a mobile game for 2-20 players, where the objective is to collect the most valuable fud possible by scavenging the map and sending negatively-valued fud to your opponents. Each player has their own screen on their device, but a shared screen tells players the overall map layout, how much time is left, and what fud is valuable or not. Players have two minutes to collect as much fud as possible as morks, tatos, and upples randomly spawn across the map, but they have to keep an eye on the economy indicators to let them know which of the three are super valuable, and which are actually negatively valued and will spoil your whole haul. Whoever has the most fud points at the end of the game wins.

I used these super helpful videos from Dan Shiffman as a starting point!

  1. Coding Train 12.1: Introduction to Node

  2. Coding Challenge 32.2: Agar.io

To play, follow these steps:

  1. On a shared screen that all players can easily see, open this page.

  2. Have each player open up this screen on a personal device such as phone or laptop.

  3. When all players have chosen a color and name and have pressed start to join the map, press the start button on the shared screen page.

See below gif for an example:

Tradetatos.gif

It was actually a huge coincidence that the above example worked out so well. The coincidence that an upple spawned on our map immediately after the first trade went through is extraordinarily improbable…. So nice of the universe to do that for me.

It’s only been a week since I finished the game, but since I had spent about 10 days prior to that working on it non-stop, things are a bit of a blur. I’ll do my best to go through my process, but so many breakthroughs happened literally at 430 in the morning after I had been working on it for over 12 hours that I can’t possibly follow my own mind haha. All in all, was very happy with the demo in class; I really didn’t expect it to hold up that well with 12 players. It seemed like people enjoyed just being able to see each others avatars in real time, the game was sort of secondary, but I think that just speaks to how important the real-time interaction aspect is.

Here are some screenshots from the process, and I’ll go over the general flow below them.

View fullsize Screenshot from 2018-12-04 23-35-48.png
View fullsize Screenshot from 2018-12-04 23-39-32.png
View fullsize Screenshot from 2018-12-04 23-47-34.png
View fullsize Screenshot from 2018-12-05 00-08-23.png
View fullsize Screenshot from 2018-12-05 11-57-30.png
View fullsize Screenshot from 2018-12-05 22-07-03.png
View fullsize Screenshot from 2018-12-06 00-21-34.png
View fullsize Screenshot from 2018-12-06 00-45-24.png
View fullsize Screenshot from 2018-12-06 01-34-57.png
View fullsize Screenshot from 2018-12-06 01-45-14.png
View fullsize Screenshot from 2018-12-06 01-45-20.png
View fullsize Screenshot from 2018-12-06 02-25-01.png
View fullsize Screenshot from 2018-12-06 03-37-21.png
View fullsize Screenshot from 2018-12-06 04-01-56.png
View fullsize Screenshot from 2018-12-06 04-32-19.png
View fullsize Screenshot from 2018-12-06 04-34-38.png
View fullsize Screenshot from 2018-12-06 05-36-54.png
View fullsize Screenshot from 2018-12-06 06-04-00.png
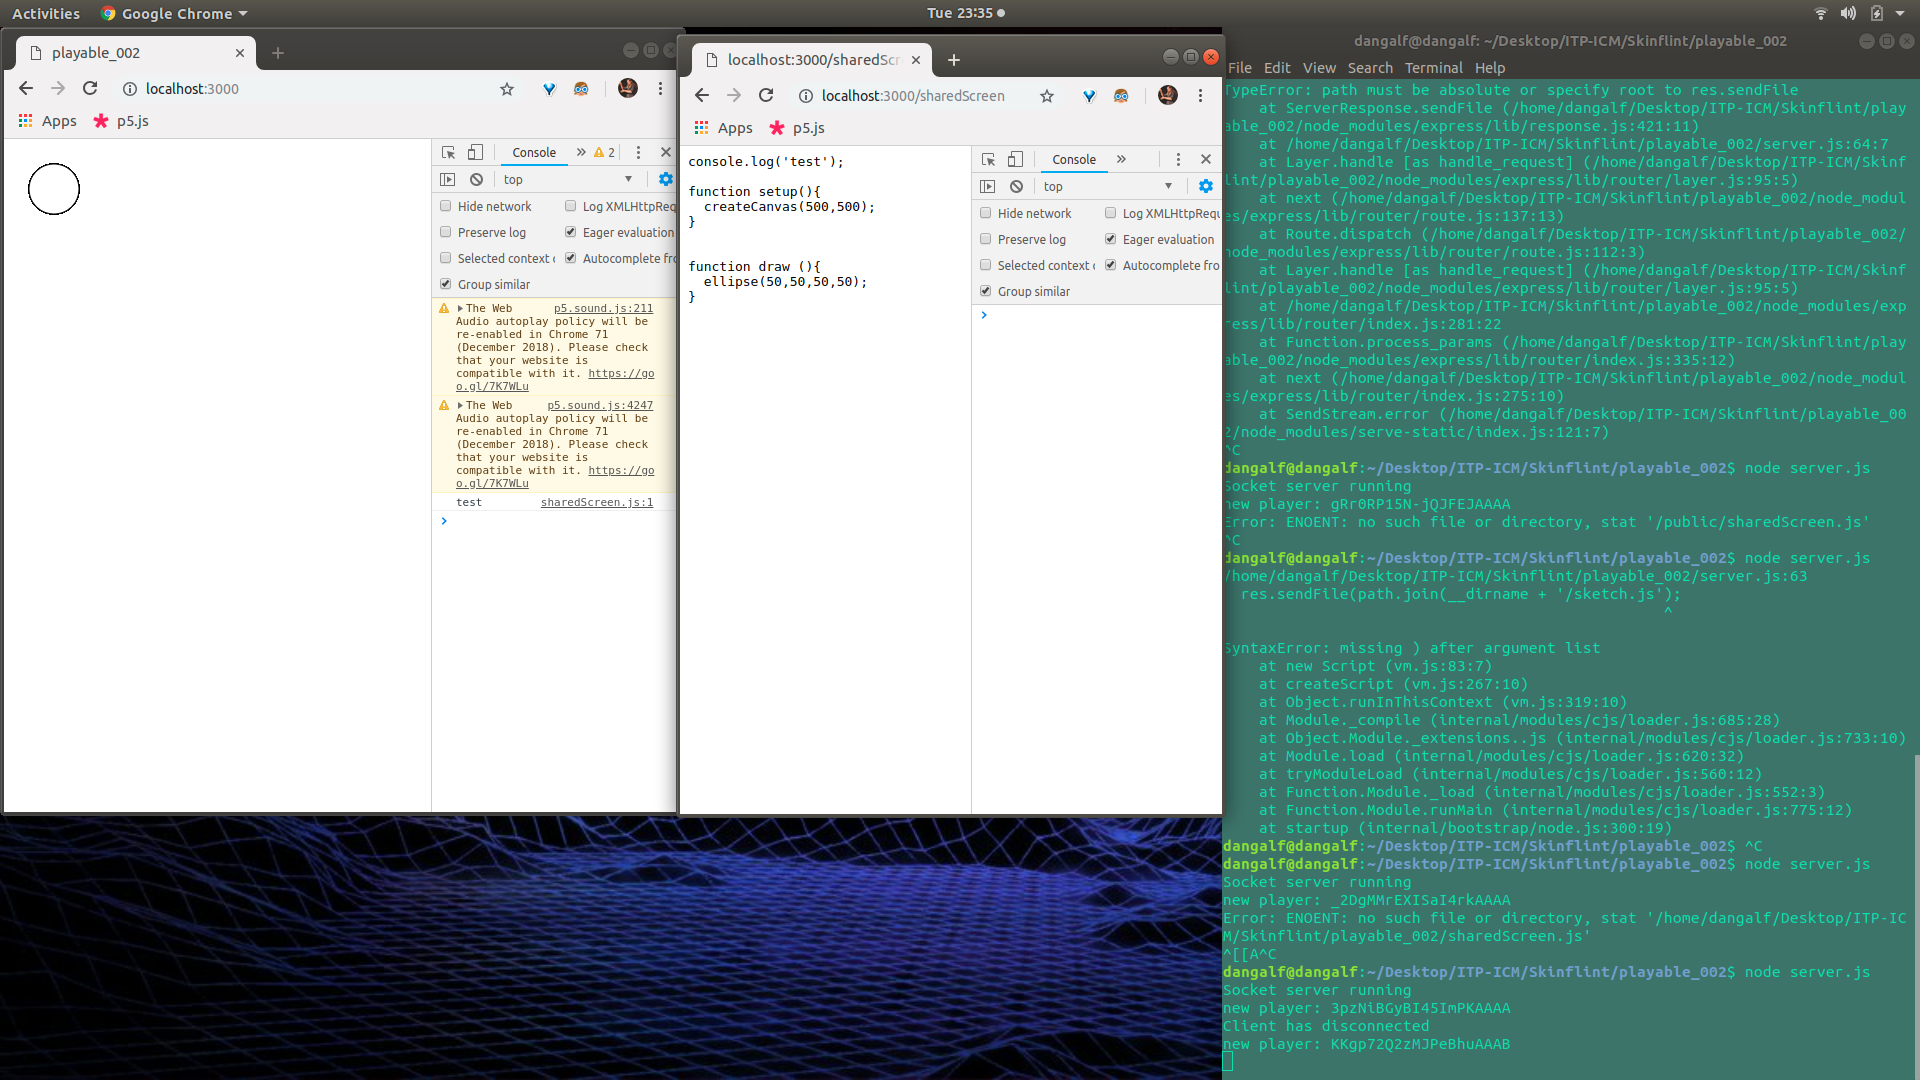
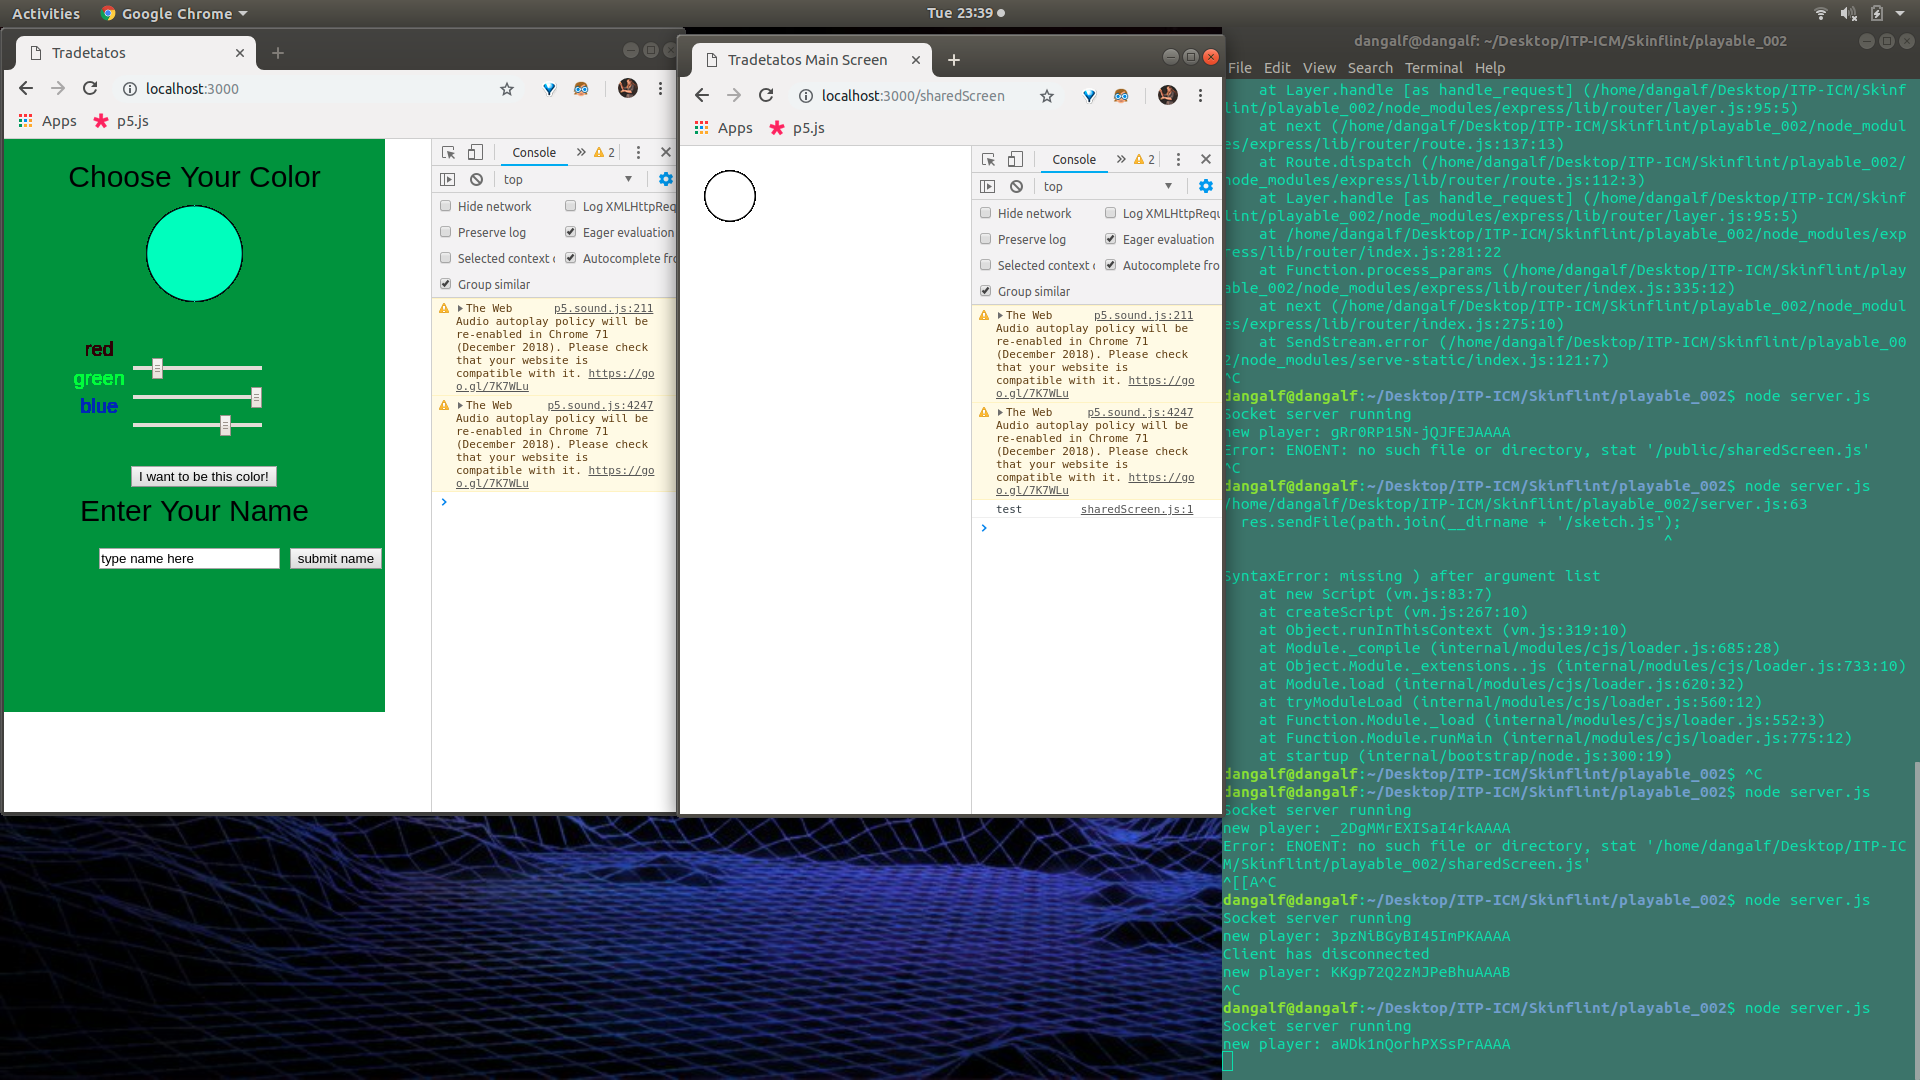
  • So the first step was obviously to fix the problem I had during the playtest which was that the different screens weren’t actually able to communicate across the heroku-deployed server. This was much more of a hassle than I thought it would be. I scheduled office hours with Shawn Van Every that Monday as a back up, but ended up staying up all night sunday and figuring it out. Articles and Tutorials that I found online just weren’t helpful to me because they assumed a basic knowledge of web design (like the difference between an html file and a js file…), but once I spent a few hours getting up to speed on all that the rest was just trial and error. Changing the code from the Coding Train tutorial was the main step, I don’t know if his Agar.io code actually works… Once I had each client just connect to socket() instead of a specific socket like socket(3000) or whatever, that fixed the communication errors.

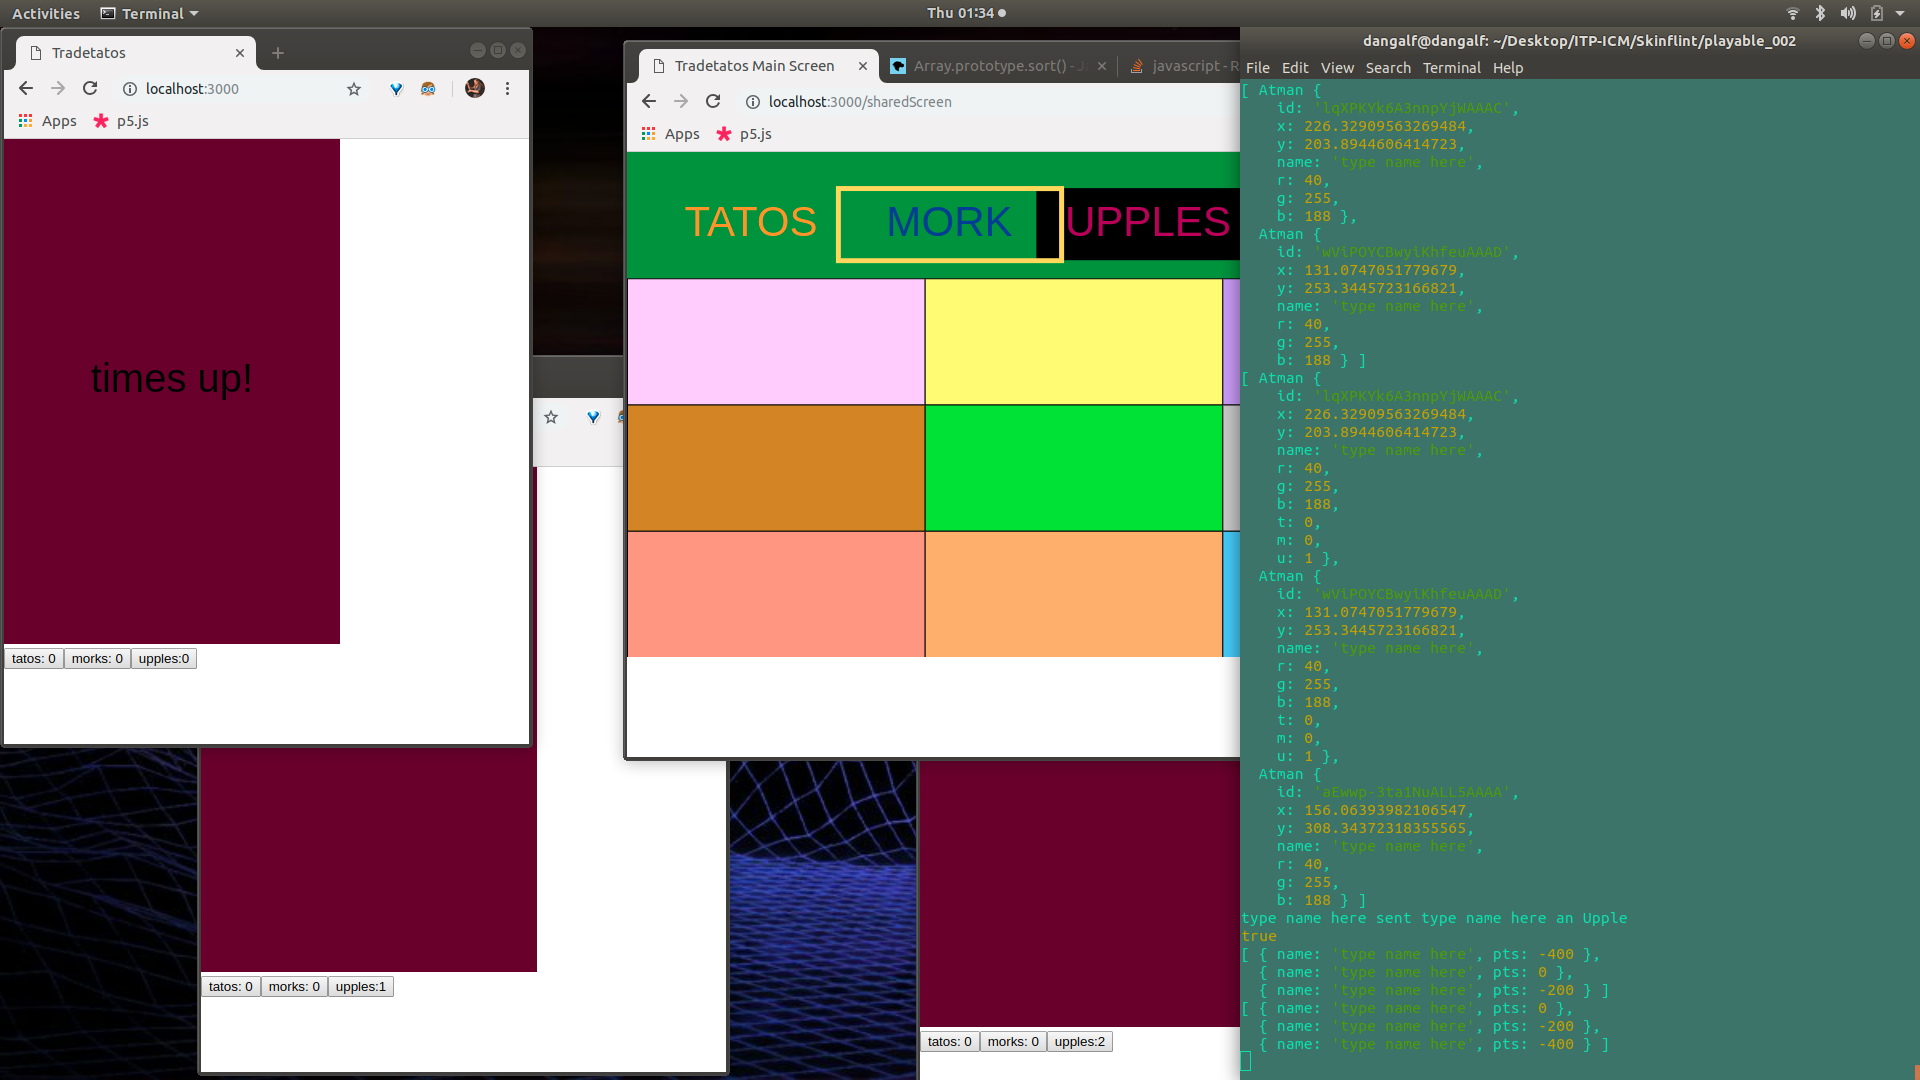
  • Then getting node to be able to send and receive messages from different js files was the next big thing. I had originally wanted to have a shared screen like jackbox, but figured that would be way harder (it was) so I started coding this to have a button where people could open different menus from their screen to see the map, timer, and economy indicators. I realized that was going to be way too cluttered and confusing, and that I needed to keep the user’s screen as simple as possible and offload all the shared information to the main screen. After messing around with file paths and eventually realizing I had to change the html files for each type of js file, I got the shared screen to be able to start a timer that would send a “times up!” message to the players after time ran out.

  • The atom picture was just to show my work environment, I ended up changing a lot of this code by the end.

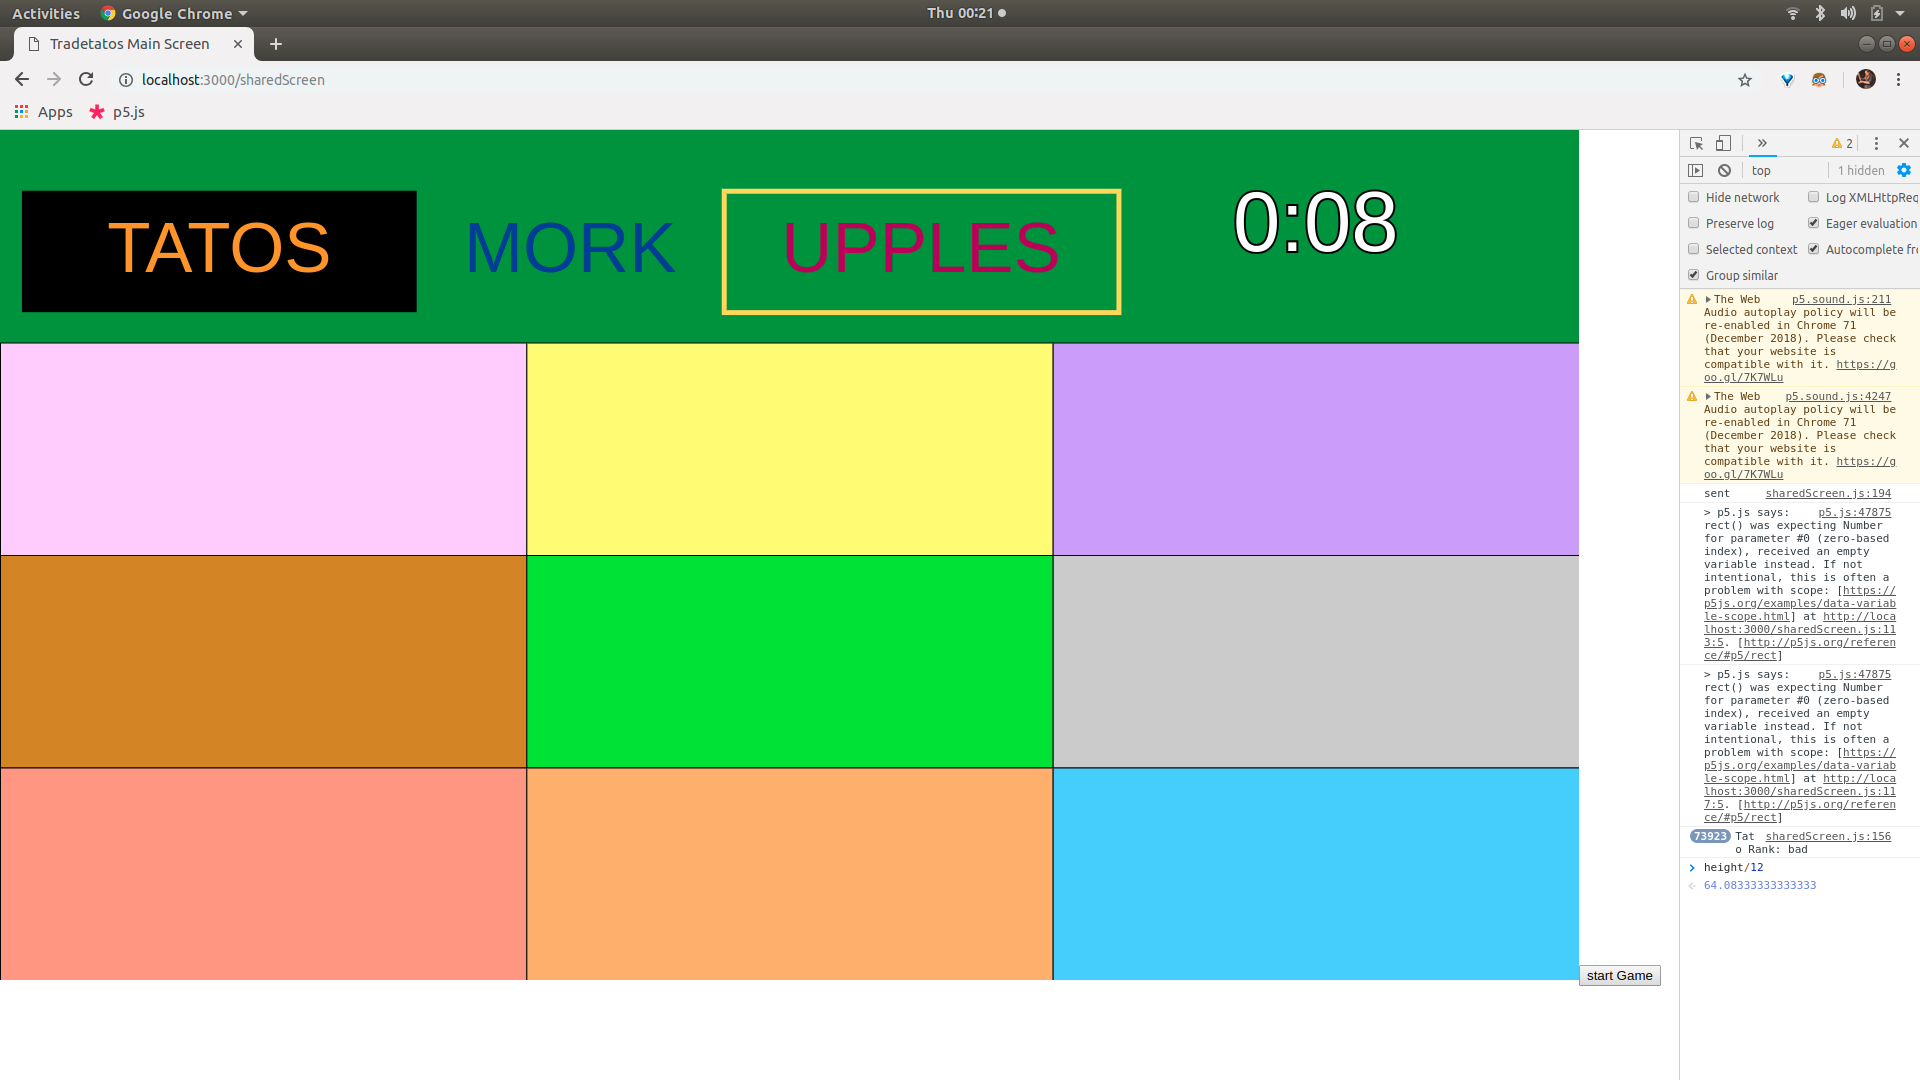
  • Then I set to work on the shared screen, establishing the map tiles and their 3x3 grid. I just picked random colors that I thought would contrast the background and the fud icons. After playing with different layouts of the shared screen, I knew I needed to have the fud economy text match the user’s fud buttons (I tried getting the user’s fud buttons to change colors but couldn’t figure it out in time), and so putting the economy text and the timer on top was essential. I was worried having the map be stretched horizontal on the main screen would be confusing since the map tiles are vertical on the player screens, but in the end I don’t think people were even really paying attention to the map screen, so whatever.

  • I spent too much time messing with the scaling of the shared screen elements, since I wanted the text to be big enough but not overlap on smaller screens. Plus, I had to have the gold outline for the valuable fud and the black box for the spoiled fud, and when those overlapped it really bothered me too…

  • Once I was more or less satisfied with the layout of the shared screen, I set to work on the actual game functions, with the timer and fud calculations. I spent a lot of time on how the fud ranking system worked and how the server would handle all the fud information being sent from the players (on trades and pickups). I think the end result worked really well, with the server constantly tracking how much of each fud there was so that the rarest fud was the most valuable and the middle-quantity fud being the spoiled fud. Then when the timer ran out, the server would make a value calculation for each fud type based on overall percentage and applying the appropriate economy adjustment (x2 for the gold fud, x-1 for the spoiled fud). Then it would rank sort all the players based on their final scores and output the scores on the final screen. I had drawn up a really cool sorting algorithm during Apps class, but for some reason it didn’t work :( luckily Javascript has those things built in apparently… Getting the text to scale based on the number of players was interesting, but in the end I think all this section was great.

  • There was a huge chunk of time spent on trying to get the shared screen to communicate with the player screens well, but after messing around with the syntax I think I found a basic way to do it, but I’m sure there are better/more efficient ways besides just having a bunch of different events the server is reading and sending.

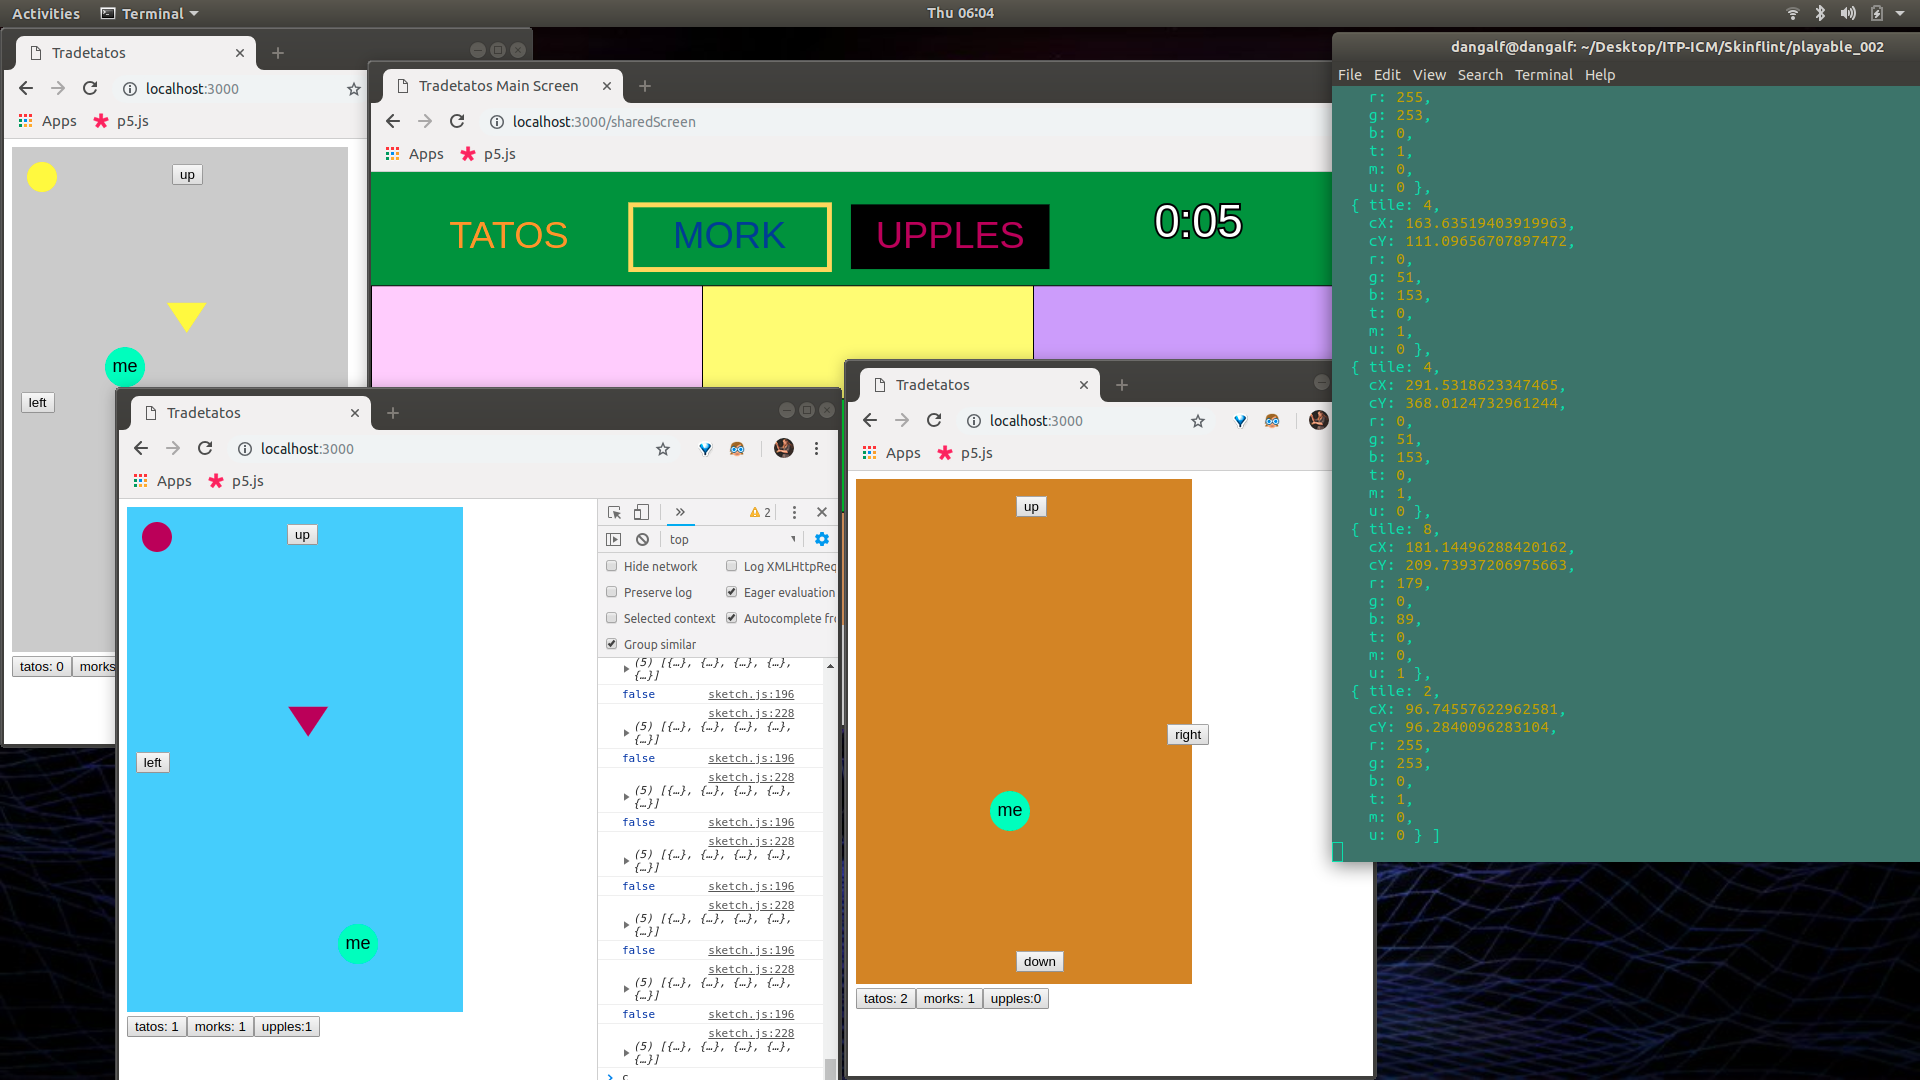
  • Then I had to get the map movement sorted out. The design went through a lot of variations, but I eventually settled on having prominent buttons on the player screen that would let them move around the grid, with their name being displayed on the main map to let them know where they were. I had an array to make sure that the direction buttons would only appear if the movement was valid, I knew it would confuse the hell out of people if they pressed a button and nothing happened. I assigned each player a random starting tile, and made sure their tile would have the same background as the matching tile on the main map. Getting the players to show up on the same map was tricky, but I ended up just including their map tile in the update object, so each player would only display another players avatar if their map tiles matched. This was later how I displayed the spawned fud too. This was the most conceptually crazy part I think, that in theory all the avatars were occupying the same rectangle, since there was no actual grid, there was just an array of objects that would contain players and only display the matching ones. Playing around with this movement was super satisfying.

  • Next was the fud generation, which I wanted to scale with player count, but ran out of time and ended up just having it spawn randomly every 3-20 seconds more or less. I had wanted to get fun assets to represent each fud type, but for simplicity’s sake, I just used triangles with colors that matched the fud text above the shared screen. Definitely not very intuitive, but I think repeat players would get it quickly. I had to make sure the pick up process was smooth and very specific since avatars would be fighting over these very quickly.

I wish I had gotten documentation of the playtest in class, since I haven’t had an opportunity to play it with anyone else since then. I’ll probably make my family try it over the holidays, but all in all, very happy with how this experiment in networked gaming turned out considering how little I knew about web stuff literally two weeks ago. Really eager to expand on this framework for the original game idea, Skinflint, and super happy I can use this as a template for the performance piece I’m doing for the winter show, Rhythm 0.0.2. Between all this and the “Collective Play” class I’m taking in the spring, I think I’ll have made some really rad stuff by this time next year. Stay tuned!

GITHUB LINK OF ALL CODE

To Do // Next Features to Implement

  • Be able to reset from the shared screen since player scores seem to persist if I don’t reset the server in between games.

  • Figure out how to organize my code. Do socket functions need to be in setup or draw or neither or does it not matter? Should I alphabetize my functions or have them listed in the order they’re used? Should I use shared variable names across server and client files or try and keep them unique to avoid confusion?

  • I’m not sure if mobile is working or not, I was having off and on issues where I couldn’t drag my avatar from mobile, and the map movement buttons were double clicking.

  • I also need to figure out the best way to scale the windows. I meant to try messing around with the mobile scaling advice from this awesome website (https://creative-coding.decontextualize.com/mobile/) but I didn’t have time.

  • Fix the fud spawning to scale to window instead of just (300,400)

  • I was using two different github repos for my code, one for heroku and one for local development, but that was super inefficient and a waste of time.

  • I want to have pretty code comments like Becca

  • I think people need a tutorial they can play after the character creation screen that explains the objectives, map movement, trading, and economy indicators. They could skip it if they’ve played before

  • I wonder if people would appreciate having a personal score screen on their device at the end displaying how much points they got from their fud types.

  • I need to figure out how to make the buttons different colors

  • Um, need to make it look good haha. Need to learn css.

  • Make another game.

categories: ICM
Thursday 12.13.18
Posted by August Luhrs
 

ICM Week 9: Skinflint Pitch

Skinflint

semi-cooperative survival RPG

live gaming over phones on local network

mysterious post-apocalyptic time-rift setting

social deduction and hidden roles

legacy system — persistent players, but ephemeral PCs

30-120 minutes

2-12 players

when you have nothing, will you trust anything?

Setting // Feel

deadofwinter.jpg
walking dead.png
campcook.jpeg
fallout.jpg
madmax.jpeg
deadofwinter.jpg walking dead.png campcook.jpeg fallout.jpg madmax.jpeg

Playstyle

dnd.jpg
jackbox.jpeg
DoWPCs.jpg
io.jpeg
secretHitlerroles.png
megagame.jpeg
dnd.jpg jackbox.jpeg DoWPCs.jpg io.jpeg secretHitlerroles.png megagame.jpeg

Proposed Project

Have a working prototype where users can log on to a website from their phones, create a character, and interact with other users on a shared map.

The interface would be a p5.js sketch, and the networking would be done using node.js.

skinflint_demo.gif
categories: ICM
Wednesday 11.07.18
Posted by August Luhrs
 

ICMadness: numbers, addictive, gifs! →

categories: ICM
Friday 11.02.18
Posted by August Luhrs
 

ICM Week 7: Death Test -- NYT Obituary API

This week I was happy to take a slight detour away from my lovely real estate ladies to approach a related topic:

our eventual demise.

When starting the data/API assignment, I pretty much immediately knew I wanted to work with some form of mortality data, especially after reading the super inspiring article by Jer Thorp where he mentions creating a website that returns the most recent drone strike victims. I had originally planned to work with some sort of actuarial table data similar to a previous project of mine, the Death Watch, but then I was reading the NYT, and I came across the obituary section.

So now we have this, a sketch that lets you check and see if you’re dead:

obit_gif.gif

I just used the NYT API, though I found what appeared to be a super comprehensive API of all obituaries from all around the country that I really wanted to use, but it cost $750 A MONTH!!! what the hell! Can’t a gal just scan the endless horde of the dead for free?

Anyway, getting the API to work was a whole ordeal, but mainly just because the search query stuff took some getting used to. Then it was just tweaking and fine-tuning, adding features like a different response if no obituary showed up or having a different obit come up on subsequent presses.

editor

full screen

obit_test1.PNG
obit_dead.PNG
obit_test3.PNG
obit_test4.PNG
Sorry Chunhan! Hope this doesn’t come off menacing haha, was just testing names I didn’t know would come up or not.

Sorry Chunhan! Hope this doesn’t come off menacing haha, was just testing names I didn’t know would come up or not.

obit_test6.PNG
tags: ICM
categories: ICM
Monday 10.22.18
Posted by August Luhrs
 

ICM Week 6: CMYK Pearly Gates

Okay, so the CMYK saga continues. Really excited about the progress this week, because I finally made some milestone achievements:

  • Got all the ladies to the party! Wooooo all fourrrr

  • All the sliders!!! We got alpha, we got dot size, we got zoom!

  • They loop! Wow! And there’s even a button to get them to stop looping!

It’s exciting because this is essentially what I wanted when I first started: A sketch that took these four portraits and got them to loop back and forth between the images, with the only thing changing being the size of the ellipses in the arrays. The other sliders were just to mess with, to hopefully find the appropriate alpha/dotsize, since that was giving me trouble.

The major issues now (if I dare to keep working on this), are legion:

  • How do I get it to run faster without sacrificing image quality?

  • How do I increase image quality without actually having a huge image that I have to scan for pixels? Or should I just use near-group pixel processing or whatever that thing is that takes an average of a pixels neighboring matrix?

  • What alpha and dot size do I use?!??!?

  • How do I zoom without getting that corner distortion? (I suspect the answer will be obvious once I take a fresh look at it, I’m currently sleep deprived and on a lot of dayquil…)

  • How do I get the screen to be the right size? I suspect this issue lies within html, which I have very little interest in, unfortunately…

Editor:

https://editor.p5js.org/DeadAugust/sketches/ryCh-OGo7

Full Screen:

https://editor.p5js.org/full/ryCh-OGo7

tags: ICM
categories: ICM
Wednesday 10.17.18
Posted by August Luhrs
 

ICM Week 5: CMYK Purgatory

This week was pretty rough so I didn’t have as much time to work on ICM as I wanted to — and I really mean that, I was super excited all week about my idea, but could only find bits and pieces of time to work on it. So unfortunately this sketch doesn’t fit the assignment yet, and the progress is pretty marginal from the last week to now. Overall though, I’m really happy with how this sketch is turning out, and I really feel like I’ve got a good grasp on the concepts now. I got the rotation issue fixed by pre-rotating the images in processing, I met with Alejandro the resident to clear up my class/object confusion, and I’m really excited to utilize the DOM stuff we’re learning about to add all the sliders to the sketch (stepSize, portraits, alpha, zoom) and a toggle button that pauses or turns on the loop. I’m also excited to test using higher quality base images, since I had originally scaled down to go easy on the rendering, as Dan Shiffman had advised.

Here’s what I have now, and though it doesn’t look all that different at first glance, I’m super proud of the small differences:


Editor:

https://editor.p5js.org/DeadAugust/sketches/HyewFYtcm

Full screen:

https://editor.p5js.org/full/HyewFYtcm

tags: ICM
categories: ICM
Wednesday 10.10.18
Posted by August Luhrs
 

ICM Week 4: CMYK Hell

So I went a bit off track this week. I wasn’t really sure what to focus on for this week’s assignment, and over the weekend I was talking to a photographer friend of mine who wanted to do some video art of one of his photo series. He has an art book full of giant prints of real estate ladies he’s gotten from newspapers, flyers, and bus benches from around the country, and they’re all super zoomed in so you can see the CMYK printing dots and it’s really beautiful:

ladies #3, 1200 dpi copy 2.jpg

Basically imagine that but 2 feet wide. Anyway, so he was talking about wanting a video where the CMYK dots in one face move and morph to become another face, in an infinite loop between all the faces. He said he talked to someone who said they could do it in about six months, and then I piped up and said, “Well, I bet I could do it by Thursday?”

Oh, the hubris.

Before I could even start coding, I realized I needed to completely learn from scratch how CMYK printing even works, something I had no idea about before last week. It was cute how excited I got when I realized the colors were just all on grids set at different angles. It was fun imagining how I would code these arrays to show up at different angles (but less fun actually trying to). I figured I could just replicate the process from the slider sketch last week and just have four arrays for each image fade the values between all of them — little did I know how hard even just getting the values would be.

It’s 2 am and I’ve been working on this for way too long, so here’s the sparknotes of how the process went this week:

Step 1) Take a small part of the picture into photoshop and use the CMYK tool to grab individual images for each color. Here’s the “Y” of the mouth:

lady3.2_mY.jpg

Perhaps that might’ve worked had the image not already been printed with the CMYK dots — trying to do this was like filtering it twice. I figured I would be able to read a brightness value of each of these images and just assign them to an array of ellipses for each color, but I couldn’t find a function in p5.js that worked the way I wanted it to, since the array of each image has 4 elements per pixel (r,g,b,a). I think processing itself would be much better for this, but I wanted to stay with p5.js for the sake of the class and the ability to eventually send my friend a website link.

So then I tried learning about all the different pixel functions built into p5.js, finding a bunch of fascinating things about group pixel processing and convolutions, but eventually landing on a page that Dan Shiffman wrote about color. While reading it, I had a sudden realization that I was paying a lot of money to be able to talk to this guy in person, not on a screen, so I quickly scheduled office hours with him for later that day. It was so surreal, it was like I walked into my computer and got one-on-one help from someone who lives in YouTube.

He basically said don’t do it haha. Or rather, that what I wanted to do would be really insanely memory intensive for p5 and javascript didn’t have the best functions for the job or something like that. I don’t remember a whole lot because I was so star-struck. But he did send me a sketch for a “brightness mirror” that took video pixels and turned them into ellipses, and that was enough for me to totally start over with a better grasp on what to do.

So I took a lower-res version of the face and rewrote a sketch with Dan’s sketch in mind, but for some reason getting the pixels to match the canvas took foreverrrrrr. But I ended up with some pretty artsy looking accidents

xMouth_art.PNG

Then once I finally got it lined up, I tried making individual ellipses for each color, instead of just greyscale:

RGB.PNG

Then came the biggest brainbender of the week: Converting RGB values into CMYK values….

I like math. I do.

I couldn’t find a pre-existing processing sketch that converted RGB to CMYK, and though I could find online calculators that did so, I really wanted to figure out the math behind it so I could easily replicate it in my code…. Three full pages of equations later, I stopped and realized I was literally trying to figure out how to invent CMYK printing and decided to suck it up and just use a calculator. I ended up having to translate the calculator into p5 variables/functions and whatnot, so I did end up understanding it (more or less). Definitely would have helped to have a better grasp on how CMYK values are actually used (I didn’t know until a good while in that they were percentages and that one would pretty much always be 0….).

So after finally getting the RGB values from the pixel array and feeding them into my expertly crafted conversion loop, I triumphantly pressed play and got this horror-show:

first_CMYK.PNG

Luckily, I understood enough about the RGB CMYK difference at this point that all I had to do was change the background to white and it fixed it.

So then, with a decent image using my fresh CMYK values, I decided to start getting more into the tricky parts of the process: shifting the arrays at an angle and having them morph into the next image. I figured for both I would probably need the ellipses to be objects instead of static images like they had been, so I tried to make a class and convert all the ellipses in my pixel for loop to objects. That’s when I came across the most beautiful accident in my short career as a creative coder:

fly.gif

That is the distilled essence of a real estate lady, metamorphosed into a happy fly, dancing across the canvas. It’s like a haiku.

I almost cried I was laughing so hard. I really do think it’s beautiful.

So here’s where I gave up for this week. I don’t understand why the loop wont push the new objects into the array — it’ll only do the first loop (four ellipses, aka the fly). I had moved it up to setup because I didn’t want it creating thousands of ellipses every draw, I only wanted the original ellipses and then have them change in draw. So I tested moving it back down to draw and giving it a jitter effect just to see, and it was clearly on the verge of blowing up my computer:

So I just took out the jitter move() and let it loop in draw infinitely. Below you can see where I ended up, I have the different colors offset by an arbitrary x, y (all horizontal), and the picture gets steadily darker as the sketch goes on and keeps drawing the same image over itself.

I really want to figure this out and help my friend, so I want to keep working on it this weekend.
First I have to figure out:

  1. why why why does the loop not push the objects into the array in setup???

  2. how the hell do I get the arrays at an angle??? translate??? go back to the original idea of making the ellipse array first and then mapping the color values to them?

  3. is it even possible to move/morph that many ellipses in p5.js or will it be so slow to be practically useless?

full screen:

https://editor.p5js.org/full/rJv6hM7cX

editor:

https://editor.p5js.org/DeadAugust/sketches/rJv6hM7cX

Sketch (above)

Original (below)

lady3.2_320x420.jpg
ladyydal.png
tags: ICM
categories: ICM
Wednesday 10.03.18
Posted by August Luhrs
 

ICM Week 3: Algorithmic Repetition (in Pairs!)

This week was really interesting! I’ve only collaborated on code once or twice in the past, so I didn’t really know what to expect from the process. I got really lucky and paired up with a visuals-minded person, since that’s not one of my strong suits at all. So it was really cool that Raaziq could come up with the look of it while I could focus on what I wanted to — the interactivity and puzzle aspect.

When we first met up, we didn’t really know where to go — I had been toying with some webcam stuff but had no idea how to introduce a satisfying element of “algorithmic repetition”. I expressed some disinterest in some of the examples from the syllabus, where it seemed like just a bunch of repeating squares with slightly different scribbles and no interaction. I tend to want things to be able to be played with, and we weren’t sure how to apply algorithmic repetition to that process without it just ending up some sort of paint tool or generative canvas. I can’t remember how we landed on this, but we ended up getting excited by the idea of a puzzle the user would have to solve by moving different images around to “put back together” a landscape that was randomly set up. Not exactly a whole lot of algorithmic repetition, but we snuck that in later, so whatever. So Raaziq said he would draft up a landscape with some flowers, and I went to work trying to figure out sliders:

slider.gif

This was my first attempt at a slider, and I was pretty excited to get it to work. I had used the map() function in other projects, but never attached to a web page based input, so it took a little bit of brain-bending to understand exactly what I needed to do. Then when Raaziq sent over the flowers, I went to town trying to figure out how a slider could move all of those pieces simultaneously, without a shit ton of repetitive code. That’s when things got really exciting, because I finally got to learn about…. classes and objects!!! Classes and objects have always eluded me, always being able to laboriously side-step them in previous projects since I never fully understood them. So when I jumped ahead a week to watch all the coding train videos on objects and arrays, it was like the veil being lifted from my eyes (is that the right expression? or is that me getting married? or the apocalypse?). The rest of that day was a gleeful frenzy of trial and error as I converted Raaziqs petals into var petal = new Petal (). I was pleasantly surprised by how intuitively some of the stuff came to me. I feel like in the past, with big coding concepts like this, I would spend hours trying to wrap my head around something, but with this I guess I had enough of the building blocks down that I could adapt to the new system with only a few hiccups. For example, in the code when I was trying to get the sliders to move the petals, I initially thought I would be able to just use an “object variable” in place of a variable that would be updated every time the slider would move:

so instead of — rectX = mouseX;

I thought it would be something like —- petals.this.x = mouseX;

which obviously didn’t work. But then, instead of bashing my head against the keyboard for an hour, I immediately (and almost non-intellectually, like I just felt it calling to me) knew I had to instead create a .move() function in the class Petal, that would then be called in the slider function instead.

So I had a lot of fun, and by the end of the day, had this:

flowerTest1.gif

The next day when Raaziq and I met up, we felt pretty good with the simple sketch and I went over how I did the sliders and objects. We decided we could add a little more to it, so we added the cloud slider (controlling the cloud haze effect from the coding train videos), changed the image variables into ones that would scale with the window, gave labels to the sliders since we didn’t have time to make actual bugs or birds, and added a win condition that would trigger if the image was put all the way back together. Overall, had a lot of fun with this, and really excited to see where we’ll go from here.

Code:
https://editor.p5js.org/DeadAugust/sketches/BkdnXedYX

Fullscreen:

https://editor.p5js.org/full/BkdnXedYX

tags: ICM
categories: ICM
Wednesday 09.26.18
Posted by August Luhrs
 

Powered by Squarespace.